AX7/D365/Operations: Create Details Master pattern form
Purpose:
The purpose of this document is to demonstrate how we can develop a Details Master form in Dynamics 365 for Operations. While doing so, it also shows how to apply the new form patternsand subpatterns.
Please note that the new Details Master pattern (Dynamics 365 for Operations) obsoletes the older ListPage pattern (AX 2012).
Prerequisites:
- Access to Dynamics 365 for Operations instance via remote desktop.
- To be provisioned as an administrator for the instance.
- Visual Studio project, model, package have been created.
- Custom table MAKInventRawMaterial has been created in the project.
Business requirement:
Ability to maintain records in a grid and detail view within the same form.
Development:
1. Click Ctrl+Shift+A to add new item to the project.
2. Navigate to User Interface > Form. Give a suitable name, MAKInventRawMaterial.
2. Navigate to User Interface > Form. Give a suitable name, MAKInventRawMaterial.

3. Drag and drop MAKInventRawMaterial table from the project to the Data Sources node.

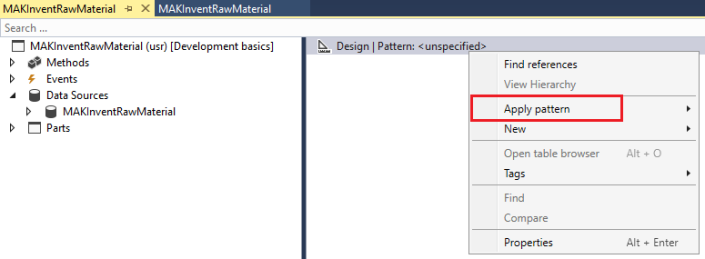
4. Right-click Design node. Click Apply pattern > Details Master.

5. Once the pattern gets applied, open the Pattern pane to see the missing controls which need to be added to comply with the pattern.

6. Add the identified missing controls to the Design node in the same order as shown in the pattern tab.

7. As you can see after adding the required controls the violations have been but still there are some warnings.
8. Navigate to FormGroupControlNavigationList to view its Pattern tab. We still have missing controls for our Navigation List control.
8. Navigate to FormGroupControlNavigationList to view its Pattern tab. We still have missing controls for our Navigation List control.

9. Adding the identified missing controls resolves the pattern issues.

10. Repeat steps 6 – 9 till all the pattern and subpattern issues have been resolved by adding the missing controls. At the end of the process, you will have a completed form ready to add data source fields to.
11. Add the following field groups to the Details panel from data source table.
11. Add the following field groups to the Details panel from data source table.

12. Add the AutoReport field group to the Grid control of the Grid panel.

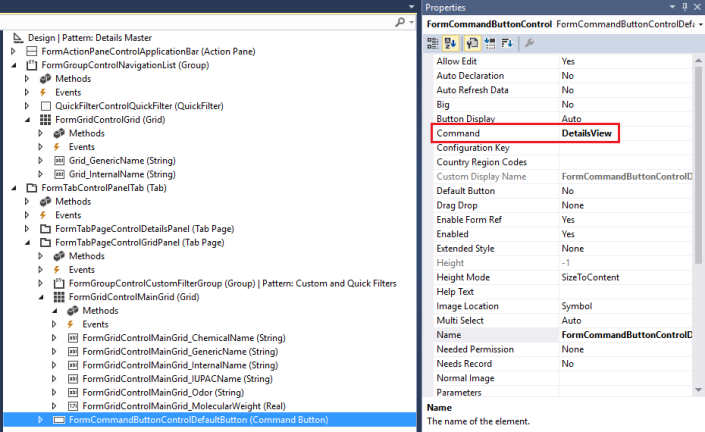
13. Navigate to FormCommandButtonControl and set Command property to DetailsView.

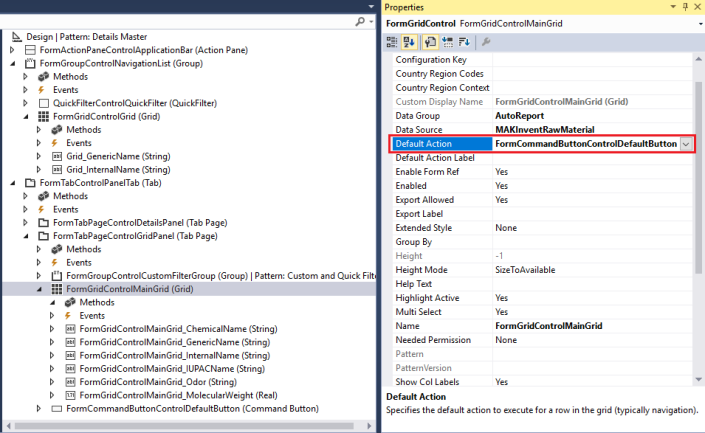
14. Navigate to FormGridControl and set Default Action property to the FormCommandButtonControl.

15. Right-click Project > Forms > MAKInventRawMaterial. Click Set as Startup Object.

16. Select project in your Solution Explorer and click Start in Visual Studio.
17. You should be able to see your form in action in the browser.
18. Grid view.
17. You should be able to see your form in action in the browser.
18. Grid view.

19. Details view.

No comments:
Post a Comment