Showing posts with label Installation and Configration. Show all posts

Thursday, 11 September 2014

AX2012R3 Dynamics Connector Step by Step Installation and Configuration

AX2012R3 Dynamics Connector Step by Step Installation and Configuration

Hi Folks,
Please find the below steps to install and configure the AX2012R3 Dynamics Connector.
Step 1:- Run the AX2012R3 installation media, click on the Microsoft Dynamics AX components.
Step 2:- Please click on the Next button to progress the installation.
Step 3:- Please click on the Add or modify components, then go with the Next button.
Step 4:- Select the Dynamics Connector Components, then go with the Next button.
Step 5:- Prerequisite validations will guide to configure the tools,please click on configure and revalidate, then go with the Next button.
Step 6:- Enter the MSDI database server name and service account for integrations.
Step 7:- Enter AOS server name and the TCp/IP port number.
Step 8:- Enter the user account to interact with Dynamics AX application for integration.
Step 9:- Please check for the prerequisite validation again before installing the components, then go with the Next button.
Step 10:- Please verify the selected Dynamics Connector component, then go with the Install button.
Step 11:- Post installation configuration tasks will be performed.
Step 12:- Make sure the Dynamics Connector component is installed successfully.
Many Thanks,
Kanha
"Helping others without any expectation will always made the others to help you"

Step to Installation and Configuration IAIF Ax 2012 ,2012R3

Web Services on IIS (AIF) Step by Step Installation and Configuration

Hi Folks,
Please find the below steps to install and configure the AX2012R3 WebServices on IIS(Application Integration Framework).
Webserver role must be installed in a server to install the AX Web services on IIS.
Step 1:- Run the AX2012R3 installation media, click on the Microsoft Dynamics AX components.
Step 2:- Please click on the Next button to progress the installation.
Step 3:- Please click on the Add or modify components, then go with the Next button.
Step 4:- Select the Web Services on IIS Components, then go with the Next button.\
Step 5:- Prerequisite validations will guide to configure the tools,please click on configure and revalidate, then go with the Next button.
Step 6:- Please enter the Business connector user account password, then go with the Next button.
Step 7:- Please select the Default website or Custom Site from the dropdown.
Step 8:- Add the relevant users to get the permissions to get the AIF virtual directory access.
Step 9:- Please check for the prerequisite validation again before installing the components, then go with the Next button.
Step 10:- Please verify the selected Webservices on IIS component, then go with the Install button.
Step 11:- Post installation configuration tasks will be performed.
Step 12:- Make sure the Webservices on IIS component is installed successfully.
Step 13:- To double check the Webservices installation, please navigate to System administration-->Setup-->Services and AIF-->Websites-->Validate and check the configuration.
Many Thanks,
Kanha
"Helping others without any expectation will always made the others to help you"

Saturday, 5 July 2014

How to Install EP in AX 2012

Enterprise Portal (EP) in Dynamics AX 2012


Introduction:


Enterprise Portal for Microsoft Dynamics AX provides a Web-based application framework that allows for users to
 interact with data in Microsoft Dynamics AX through a Web browser.You can create new content for Enterprise Portal,
 and also modify existing content. Most additions and changes can be made using resources in the Application Object
 Tree (AOT) in combination with SharePoint. More advanced applications and modifications can be created by using 
Visual Studio and the development framework for Enterprise Portal. 

Installation  & Configuration:

Prerequisites:

  •          x64 Machine
  •          Operating System
  •          Windows Server 2008 SP2
  •          Windows Server 2008 R2
  •          SharePoint 2010


Installation:

Start MS Dynamics AX setup and select "Enterprise Portal (EP)" under web server components, reporting services 
extension (to install Dynamics AX reporting services - required to view AX reports on EP) and visual studio tools
 (required for EP development) 


click next button to proceed forward,


if there are no errors go to to next step and provide your domain and password,


select the components as below and proceed,


 go to next step,


go to next step,


click install,


when installation is done you can verify EP installation (go to */System administration(Area page)
/Setup/Enterprise portal(fast tab)/web sites/ check internal and external URL's and click "view 
in browser" button, this will open EP role centre page). 

Thursday, 3 July 2014

Install DNS Server in Windows Server 2008

Install DNS Server in Windows Server 2008


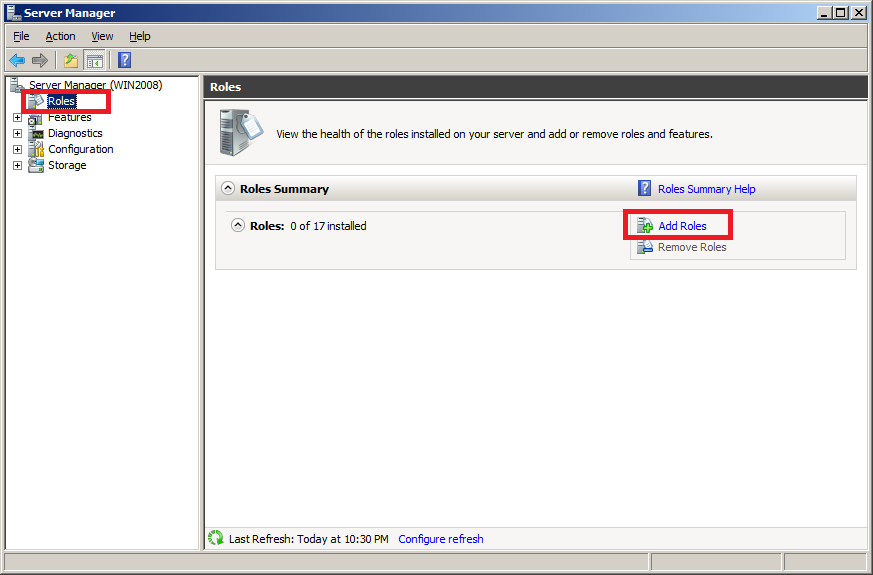
  • Launch Server Manager by clicking Start > Administrative Tools > Server Manager. Click Roles and then Add Roles.
Install DNS Server in Windows Server 2008 - Step 1
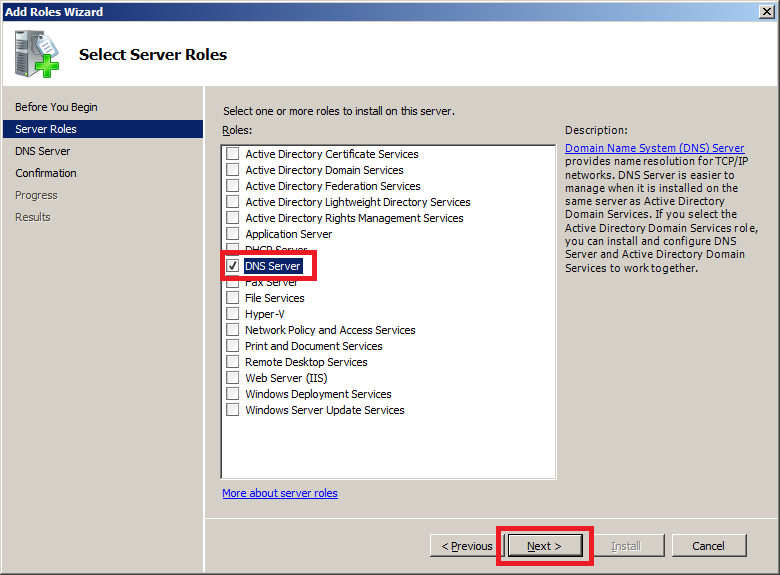
  • Select DNS Server from the list and then click Next button.
Install DNS Server in Windows Server 2008 - Step 2
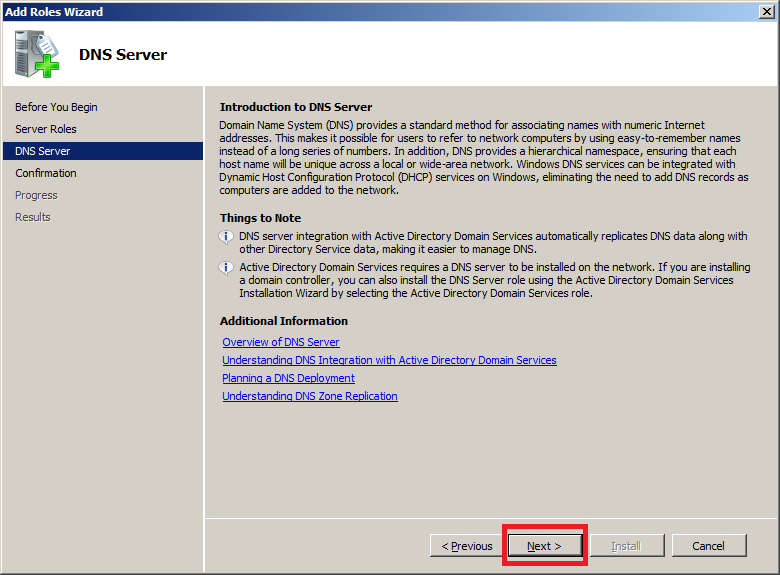
  • A little introduction to DNS Server and a few useful links for further details as shown in below image. Click Next to move on.
Install DNS Server in Windows Server 2008 - Step 3
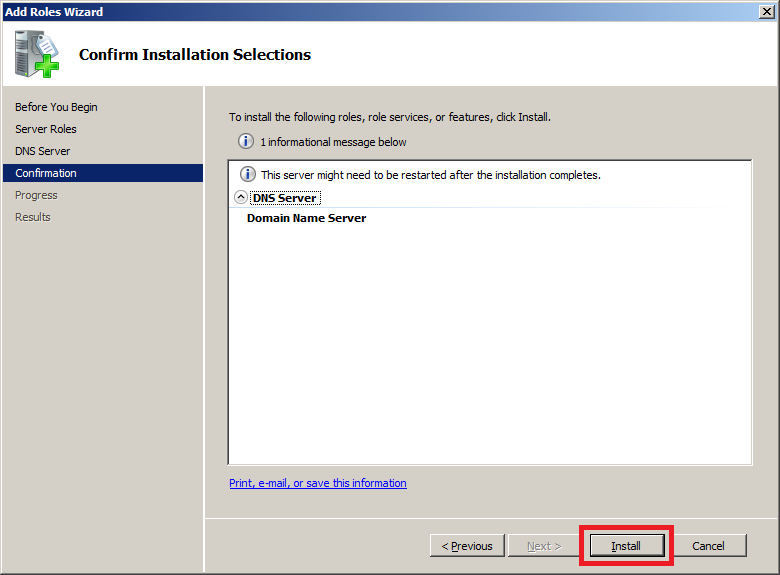
  • Click Install button.
Install DNS Server in Windows Server 2008 - Step 4
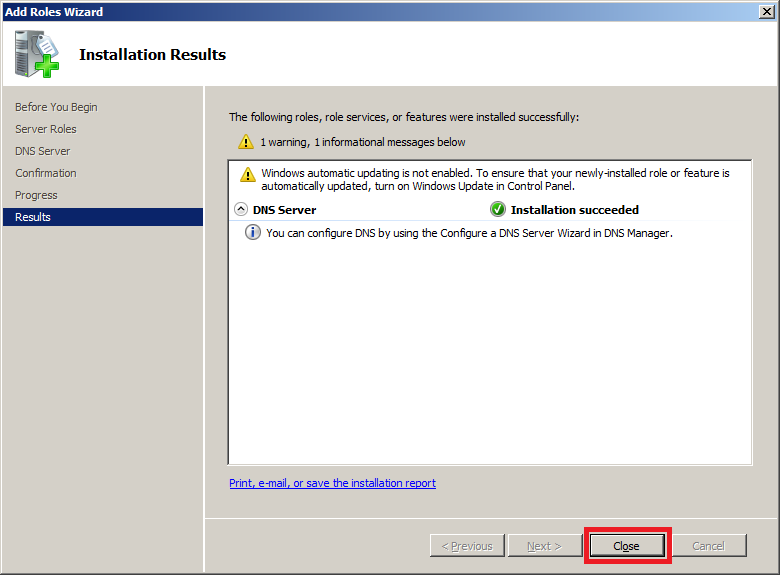
  • DNS Server has been installed successfully as per below snapshot. Click Close to finish the Add Roles Wizard.
Install DNS Server in Windows Server 2008 - Step 5

Creating Forward Lookup Zone

  • Launch DNS Manager by clicking Start > Administrative Tools > DNS or type dnsmgmt.msc in Run window (Press Windows Key + R) and press Enter.
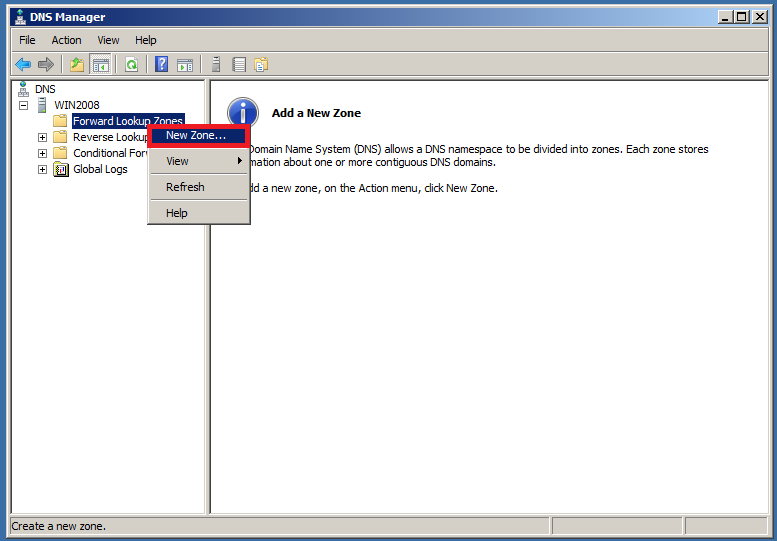
  • Expand Server (e.g. WIN2008) > Right click Forward Lookup Zones > New Zonewhich will launch New Zone wizard.
Configure DNS Server in Windows Server 2008 - Step 1
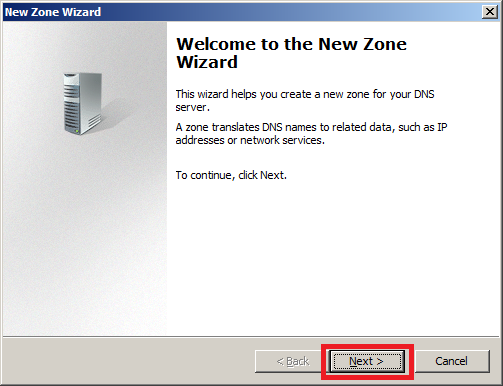
  •  Click Next on Welcome to the New Zone wizard.
Configure DNS Server in Windows Server 2008 - Step 2
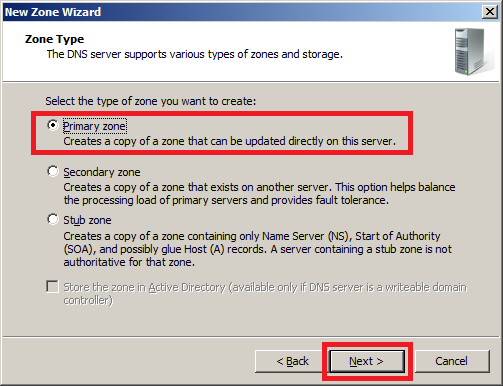
  • Since this is our primary DNS Server for the zone select Primary zone. Then move on by clicking Next button.
Configure DNS Server in Windows Server 2008 - Step 3
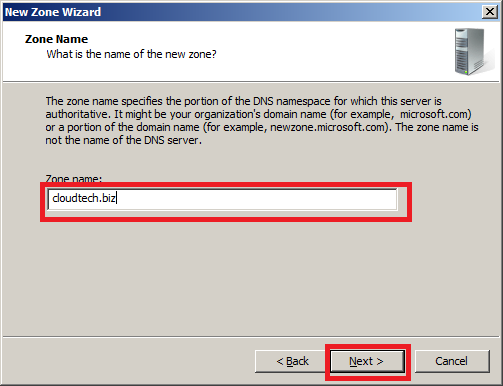
  • Enter the domain name for which you want to create the zone for e.g. gopalthorve.com. Say you want to build up DNS Server for your own Windows Server 2008 based hosting server then enter your registered domain name here otherwise if it is for intranet only it can be anything (domain naming conventions must be followed). The zone can also be created for subdomain e.g. us.gopalthorve.com.
Configure DNS Server in Windows Server 2008 - Step 4
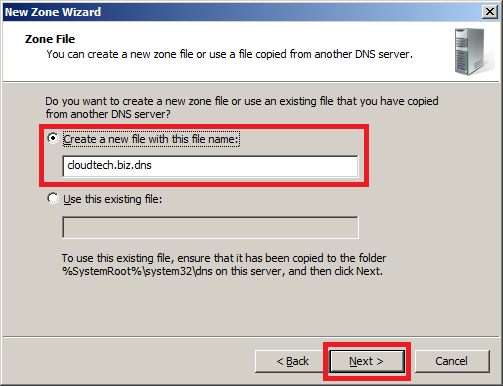
  •  Zone File Options:
    • Create a new file with this file name: Enter the physical zone file name where all zone information will be stored for this domain/subdomain. This file will be created under %systemroot%\system32\dns. Follow standard zone file naming convention e.g. gopalthorve.com.dns.
    • Use this existing file: If you already have a zone file for this domain/subdomain then select this option and specify zone file name here. You need to put this zone file under %systemroot%\system32\dns folder
Configure DNS Server in Windows Server 2008 - Step 5
  • Dynamic Update: Here you can specify if this DNS zone will accept secure, nonsecure or no dynamic updates from client.
    • Allow only secure dynamic updates (recommended for Active Directory): This is available only for Active Directory integrated zones. This setting allows Active Directory client machines to register their name as resource records pointing towards their dynamic/static IP address.
    • Allow both nonsecure and secure dynamic updates: This should never be enabled because it allows all clients secure and nonsecure both to update from all clients.
    • Do not allow dynamic updates: This should be the preferred setting if you are setting up this zone for your own hosting server. This denies dynamic updates to zone resource records from all client and you will need to change them manually whenever required. We will choose this option and then move on.
 Configure DNS Server in Windows Server 2008 : Dynamic Update
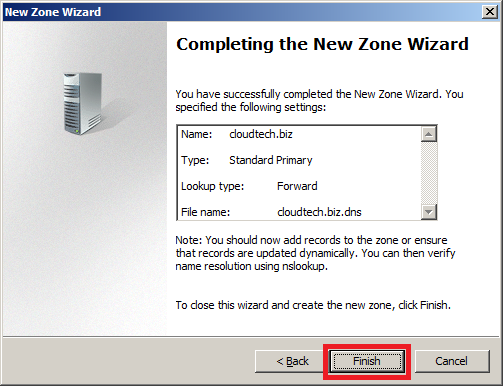
  • Forward lookup zone has been created successfully for gopalthorve.com and shows the summary as in below image. Click Finish to close the New Zone Wizard.
Configure DNS Server in Windows Server 2008 - Zone Created

Configure Forward Lookup Zone

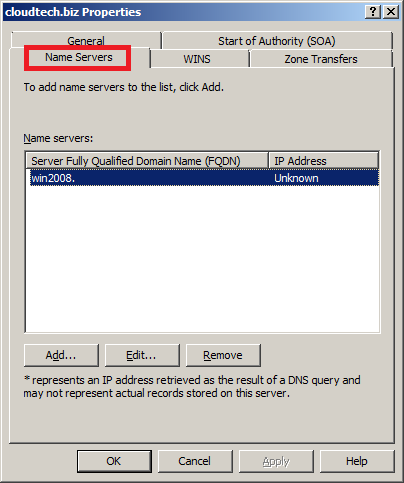
  • Right click on gopalthorve.com (forward lookup zone recently created) and then click Properties.
Configure DNS Server in Windows Server 2008 - Name Servers
  • Name Servers: Here we can configure nameservers for the zone gopalthorve.com.
    • Remove the default entry from the list.
    • Click Add… button to add new nameserver record.
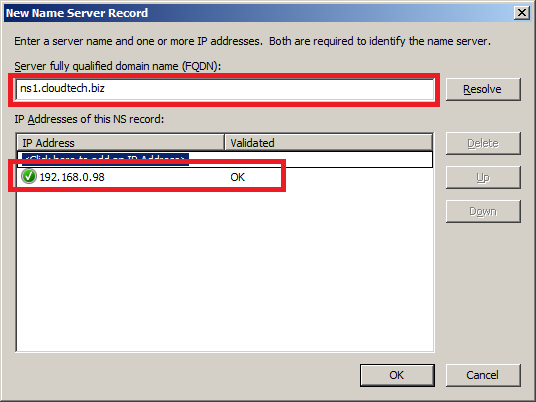
    • Tye fully qualified domain name (FQDN) of the nameserver for your domain. I am configuring my own live DNS Server and hence I entered ns1.gopalthorve.com.
    • Enter the IP addresses to which ns1.gopalthorve.com will resolve to. I am entering private IP address of my computer here for example purpose only. Please replace it by your Public IP Address allotted by your ISP or dedicated or VPS hosting provider.
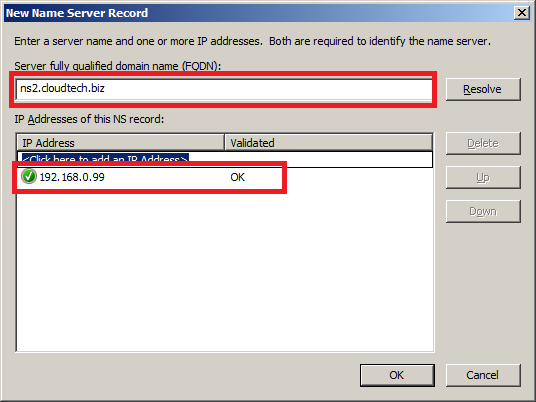
    • Similarly create another nameserver record. I created it as ns2.gopalthorve.com pointing to 192.168.0.99 (Please replace it by your Public IP Address allotted by your ISP or dedicated or VPS hosting provider.). Second nameserver record is required because your domain name registrar will require atleast two nameservers for pointing your domain to the DNS server we are configuring. We are configuring both nameservers pointing to the same DNS Server configured with multiple IP Addresses. (ns1.gopalthorve.com >> 192.168.0.98 and ns2.gopalthorve.com >> 192.168.0.99).
    • Click Apply to save changes.
 Configure DNS Server in Windows Server 2008 - New Name Server 1
Configure DNS Server in Windows Server 2008 - New Name Server 2
  • Start of Authority (SOA)
    • Serial number: This is the serial number for the zone. This should be set to YYYYMMDDNN where YYYY is the year, MM is the month, DD is the day and NN is the count is the count indiciating how many times the zone modified on that particular day. Whenever you change zone data occurs this serial number must be incremented by one. When slave nameserver contacts master for zone data it compares its own serial number with master’s serial number and its less than masters serial number then slave nameserver updates its zone data from master.
    • Primary server: This is the FQDN of nameserver which you want to set as primary nameserver for this zone. In my case its ns1.gopalthorve.com.
    • Responsible person: Specify the email address of the administrator who is responsible for maintaining this zone. Here email address must be specified in dotted format e.g. hostmaster@gopalthorve.com must be specified as hostmaster.gopalthorve.com. This is required when other webmasters wants to contact the maintainer of the zone in case of any issues.
    • Refresh interval: This value instructs the slave nameserver how often to check that the data for this zone is up to date. Set this to 1 day if zone doesn’t change frequently. For the DNS server for hosting purpose 1 day is idle.
    • Retry interval: In case slave nameserver failed to connect to master after Refresh interval (in case master is down or unreachable), slave tries to connect to master every interval specified here. Generally Retry interval is shorter than Refresh interval but its not compulsory. Enter 2 hours here.
    • Expires after: If the slave fails to connect master for this much time, the slave expires the zone. Expiring the zone means it slave stops responding to queries for this zone because the zone data that slave is having is very old. Enter 7 days here.
    • Minimum (default) TTL: TTL stands for Time To Leave. This applies to all negative responses from the authoratative nameservers. Enter 1 day here.
    • TTL for this record: TTL for SOA record.
    • Click Apply to save changes.
Configure DNS Server in Windows Server 2008 - SOA Configuration
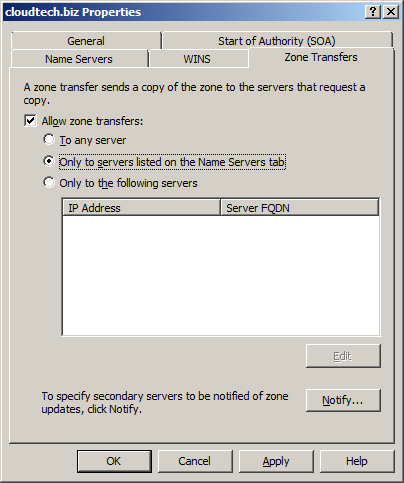
  • Zone Transfers: Zone transfer is the process of transferring entire zone to the requesting server/client. The best practice is to not allow every one to connect and transfer the zones. You can allow only specific server for zone transfers i.e. the slave nameserver for the zone. We can setup to notify the servers if any zone updates happen on this zone.
    • Allow zone transfers: Enables/disables zone transfers.
      • To any server: All server/clients will be allowed to transfer zones. Not recommended.
      • Only to servers listed on the Name Servers tab: Zone transfers will only be allowed to the nameservers specified under Name Servers tab (ns1.gopalthorve.com, ns2.gopalthorve.com). Highly recommended for DNS Servers for web hosting servers.
      • Only to the following servers: If you want to enter IP/FQDN to which zone transfers will be allowed select this option and then click on Edit button and list all IP/FQDN allowed for zone transfers.
Configure DNS Server in Windows Server 2008 - Zone Transfers
    • Notify…:
      • Automatically notify: Enables/disables automatic notification of zone changes to either nameserver listed on Nameservers tab or specified IP addresses/FQDN names.
      • Servers listed on the Name Servers tab: Selecting this will only zone update notification will only be sent to nameservers listed under Name Servers tab. This is the recommended setting.
      • The following servers: You can specify list of other name servers to whom you want to send automatic notification of zone updates.
Configure DNS Server in Windows Server 2008 - Zone updates notify

Configure DNS Server Properties

  • Open DNS Manager by clicking Start > Administrative Tools > DNS.
  • Right Click on the DNS Server for which you want to configure Properties for and click Properties.
  • Interfaces: You can configure DNS Server to listen on specific interfaces/IP Addresses or all IP addresses. If the server has multiple interfaces then you can configure DNS Server to listen on specific interface. If the server is having only single interface with multiple IP addresses configured then you can configure it to listen on specific IP addresses. By default it is configured to listen on all interfaces and all IP addresses.
Configure DNS Server level Properties - Interfaces to listen on
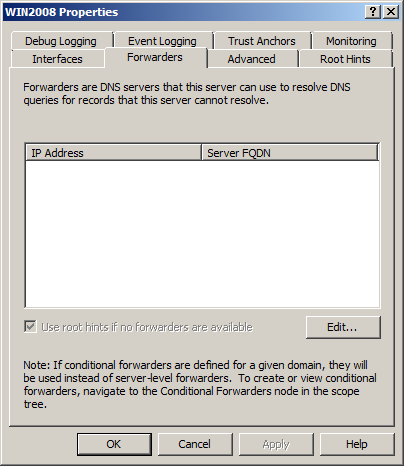
  • Forwarders: You can add other DNS Servers provided by your ISP to forward DNS queries to in case this server doesn’t hold zones for the domains. These forwarder addresses are only used recursion is enabled. Forwarders are required if you are having an intranet/extranet DNS server serving a few zones and want to allow same server to resolve other DNS queries too.
Configure DNS Server level Properties - Forwarders
  •  Advanced: You can configure some advanced aspects of DNS Server here. A very important options I want to discuss here is Disable recursion (also disables forwarders). If you are setting up this DNS server to serve zones for domains hosted on your DNS server (dedicated server, VPS Server, Cloud VPS Server) then enable “Disable recursion” which also disables forwarders, doing this will only allow the zones hosted on this server to be served.
Configure DNS Server level Properties - Advanced
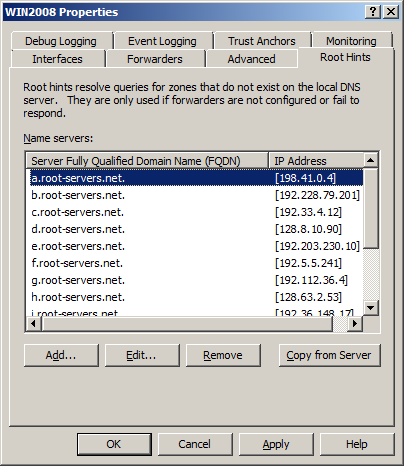
  •  Root Hints: This is the list of root name servers.
Configure DNS Server level Properties - Root Hints
  • Debug Logging: For debugging purpose the debug logs can be enabled from here.
Configure DNS Server level Properties - Debug Logging
  • Event Logging: DNS Server events can be enabled for troubleshooting purpose.
Configure DNS Server level Properties - Event Logging
DNS Server listens on TCP and UDP port 53, so make sure to allow traffic on these ports in Windows Firewall. Also make sure that if you are having any router or firewall device and DNS server is behind any of these device, do necessary configuration to allow connection to DNS Server.

Register Name Servers at Domain Name Registrar

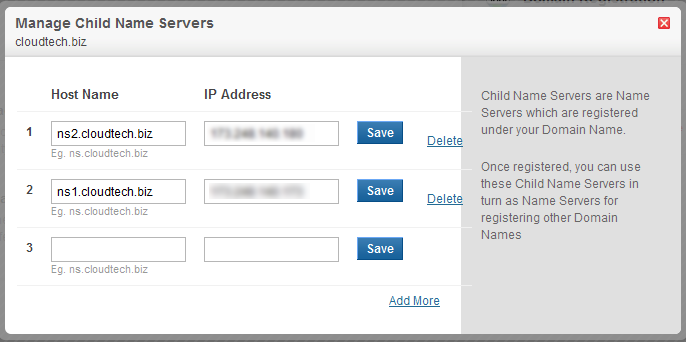
If you have a registered domain name and want to host DNS services for the domain on the DNS Server you recently configured then you have to create child name server at your Domain Name Registrar. If you have administrative control of your domain you can do this with the help of your domain name registrar otherwise ask them to do this for you. Create child name server like this:
ns1.gopalthorve.com >> 192.168.0.98
ns2.gopalthorve.com >> 192.168.0.99
Create Child Name Servers at Domain Name Registrar
Replace private IP addresses with public IP addresses on which DNS Server will listen on.

Update Name Servers at Domain Name Registrar

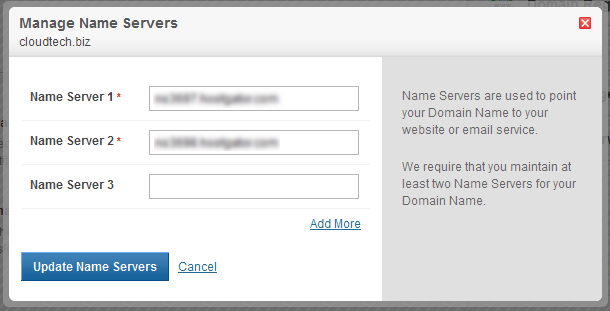
After creating child name servers you have to update name servers for your domain at Domain Name Registrar. If you have administrative control of your domain you can do this with the help of your domain name registrar otherwise ask them to do this for you. Update name servers as below:
Name Server 1: ns1.gopalthorve.com
Name Server 2: ns2.gopalthorve.com
Update Name Servers at Domain Name Registrar

@          3600    IN  SOA ns1.gopalthorve.com. hostmaster.gopalthorve.com. (
                   2012032809   ; serial number
                   86400        ; refresh
                   7200         ; retry
                   604800       ; expire
                   86400      ) ; default TTL
  • At least two Name Server (NS) DNS resource records. Primary NS record pointing to primary name server (ns1.gopalthorve.com) and secondary NS record pointing to secondary name server (ns2.gopalthorve.com). These records have already been created during the Configuration of Forward Lookup Zone. The name server records and name server host records looks as pasted below:
@                       NS    ns1.gopalthorve.com.
@                       NS    ns2.gopalthorve.com.
ns1                     A    192.168.0.98
ns2                     A    192.168.0.99
  • Host (A or AAAA) DNS resource record for the parent domain (say gopalthorve.com >> 192.168.0.98). Host (A or AAAA) record for www sub domain (www.gopalthorve.com >> 192.168.0.98) or CNAME record for www sub domain pointing to the parent domain (www.gopalthorve.com >> gopalthorve.com).
@                       A    192.168.0.98
www                     A    192.168.0.98
  • Host (A or AAAA) DNS resource record for FTP Server host for the domain e.g. ftp.gopalthorve.com >> 192.168.0.98.
ftp                     A    192.168.0.98
  • Mail Exchanger (MX) DNS resource record for Email Server host for the domain. e.g. MX record for gopalthorve.com is mail.gopalthorve.com and mail.gopalthorve.com points to host 192.168.0.99.
mail                    A    192.168.0.99
@                       MX    10    mail.gopalthorve.com.

Create Host (A or AAAA) DNS resource record

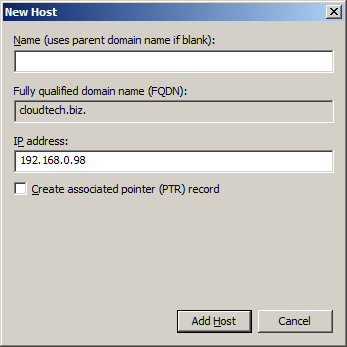
  • Open DNS Manager by clicking Start > Administrative Tools > DNS
  • Right click on the forward lookup zone and then click New Host (A or AAAA)…
  • Enter name in the first text box. If you want to create a parent domain (leave it blank). To create www record type www in this text box.
  • Enter IP address in the third text box to which this host record will point to.
  • Click Add Host button to create host resource record.
Create Host (A or AAAA) DNS resource record

Create Mail Exchanger (MX) DNS resource record

  • As discussed in MX Record, before creating an MX record we have to create a host (A or AAAA) resource record pointing to the IP address of the host where email services for the domain is hosted. I created mail.gopalthorve.com pointing to 192.168.0.99 (mail.gopalthorve.com >> 192.168.0.99).
mail                    A    192.168.0.99
  • Host or child domain: If you want to create Mail Exchanger record for parent domain say gopalthorve.com then leave this field blank otherwise type the name of sub domain for which you want to create mail exchanger (MX) record for.
  • Fully Qualified domain name (FQDN) of mail server: Enter FQDN of the host where email services for the domain is hosted. Enter mail.gopalthorve.com i.e. the host resource record we recently created pointing towards email server.
  • Mail server priority: Enter the priority (preference) value for this Mail Server, the lower the value the higher the preference. We have discussed this in detail at MX Record.
@                       MX    10    mail.gopalthorve.com.
Create Mail Exchanger (MX) DNS resource record

Create SPF (TXT) DNS resource record

  • To know more about SPF visit SPF Record and construct your SPF record text.
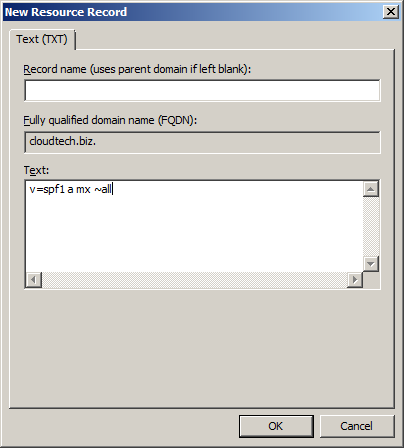
  • From DNS Manager right-click on the zone and then click Other New Records…
  • Select Text (TXT) from the window and then click Create Record… button
  • Record name: Leave blank for creating this SPF (TXT) DNS resource record for parent domain i.e. gopalthorve.com otherwise enter the name of sub domain for which you want to create this DNS resource record for.
  • Text: Visit SPF Record to construct SPF DNS resource record text and enter text in this box.
  • Click OK to create the record.
@                       TXT    ( "v=spf1 a mx ~all" )
Create SPF (TXT) DNS resource record

Create Alias (CNAME) DNS resource record

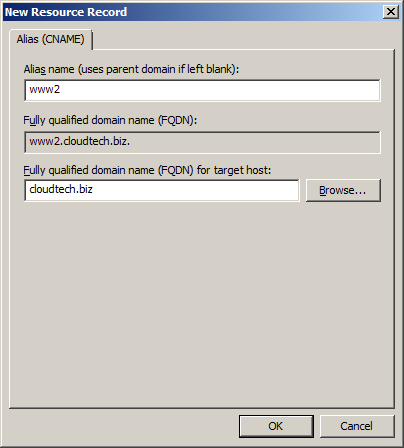
  • From DNS Manager right click on the forward lookup zone and click New Alias (CNAME)…
  • Alias name: Enter the alias or canonical name here e.g. I want to identify parent domain gopalthorve.com with the alias name of www2.gopalthorve.com then enter www2 in this text box.
  • FQDN for target host: Enter the FQDN of target host here. In our example this will be gopalthorve.com
One more example: I want to create a Alias name for google.com asgoogle.gopalthorve.com then in alias name text box I will enter google and in target host text box I will enter google.com.
www2                    CNAME    gopalthorve.com.
google                  CNAME    google.com.
Create Alias (CNAME) DNS resource record

Looking at Zone File

Entire zone file (gopalthorve.com.dns located under %systemroot%\system32\dns folder) for gopalthorve.com looks like below:
;
;  Database file gopalthorve.com.dns for gopalthorve.com zone.
;      Zone version:  2012040913
;

@          3600    IN  SOA ns1.gopalthorve.com. hostmaster.gopalthorve.com. (
           2012040913   ; serial number
           86400        ; refresh
           7200         ; retry
           604800       ; expire
           86400      ) ; default TTL

;
;  Zone NS records
;

@                       NS    ns1.gopalthorve.com.
@                       NS    ns2.gopalthorve.com.

;
;  Zone records
;

@                       A    192.168.0.98
@                       MX    10    mail.gopalthorve.com.
@                       TXT    ( "v=spf1 a mx ~all" )
ftp                     A    192.168.0.98
mail                    A    192.168.0.99
ns1                     A    192.168.0.98
ns2                     A    192.168.0.99
www                     A    192.168.0.98

Labels

#veryusefulcode (1) AIF (8) AOT Maps (1) Args (1) Ax 2009 Reports (2) AX 2012 navigation (1) Ax 2012 Interview Questions (1) AX 7 (2) AX Architecture (1) Ax Backup (1) AX Workflow (2) AX2012 (1) AX2012 R2 (1) Ax2012R3 (1) AX2012R3 Dynamics Connector Step by Step Installation and Configuration (1) AX2012R3 EP Step by Step Installation and Configuration EP R3 (1) AX2012R3 HelpServer Step by Step Installation and Configuration (1) AX2012R3 Rapid Start Connector Step by Step Installation and Configuration (1) AX2012R3 Report Server and Analysis Server Step by Step Installation and Configuration (1) AX7 (1) Best practices (1) Blocking user to enter (1) Collection Classes (1) Container (1) D365FO (3) Data Migration Frame Work ax 2012R3 (1) Deleting duplicate Record from Table – Ax2012 (1) Delivery due date notification workflow in Ax 2012 (1) Development Steps EP (1) Dimensions (1) DIXF (1) DMF in Ax 2012 R3 (1) Dynamics Ax 2012 Interview Questions (1) DYNAMICS AX 2012 INTERVIEW QUESTIONS PART 2 (1) DYNAMICS AX 7 (1) EDT relation Migration Tool (1) EP AX 2012 (1) Ep Lookup (1) Error (1) Event Handler (1) F5 (1) File Handling (4) Filter on AX2012 Listpage (1) filtering (2) financial dimensions in AX 2012 (3) form (1) images (1) Installation and Configration (4) Installation and Configuration (11) Installation of Management Reporter 2012 for AX 2012 (1) Interaction class in ax 2012 (1) Interview Question (1) Interview Questions For Ax 2012 (1) Invent DIm (1) Jobs (2) license (1) List page and form menuitem enable code (1) Methods (1) microsoft Dynamics AX 365FO (1) Number Sequence Generation – AX 2012 (5) Number Sequence2012 (1) OLTP-OLAP (1) Passing Args (1) Passing form caller and menu item caller in ax 2012 (1) Passing Multiple Records Args (1) Posting in Ax 2012 (1) POSTING PURCHASE ORDER (1) Query (1) Query Filter Form (2) Query Ranges in X++ (1) Question and Answer (1) Report (1) Reports Controller class (1) RLS in ax 2009 (1) SALES ORDER IMPORT/EXPORT FRAMEWORK BY DMF (1) Security (1) security roles (1) Security Sysqueryrangeutil (1) Sharepoint 2016 (1) SQL SERVER (1) SSRS (2) SSRS Reports Controller class (2) Table collections & Virtual company (1) Time (1) TIPS AND TRICKS (1) Web service AIF (3) Web Services on IIS (AIF) Step by Step Installation and Configuration (1) workflow ax2012 (1) Workflow installation (1) Workflow Method (3) X++ (1)