Showing posts with label D365FO. Show all posts

Friday, 15 June 2018

all report deployment for powershell in d 365

all report deployment for powershell in d 365


Open windows powershell in administrator mode.
execute below comments


1.paste the "Set-ExecutionPolicy Unrestricted" instructions
2. then select  "Y" for yes.
3. paste the below instructions


C:\AosService\PackagesLocalDirectory\Plugins\AxReportVmRoleStartupTask\DeployAllReportsToSSRS.ps1 -PackageInstallLocation “C:\AosService\PackagesLocalDirectory”

Friday, 1 June 2018

AX7/D365/Operations: Create Details Master pattern form

AX7/D365/Operations: Create Details Master pattern form

Purpose:

The purpose of this document is to demonstrate how we can develop a Details Master form in Dynamics 365 for Operations. While doing so, it also shows how to apply the new form patternsand subpatterns.
Please note that the new Details Master pattern (Dynamics 365 for Operations) obsoletes the older ListPage pattern (AX 2012).

Prerequisites:

  • Access to Dynamics 365 for Operations instance via remote desktop.
  • To be provisioned as an administrator for the instance.
  • Visual Studio project, model, package have been created.
  • Custom table MAKInventRawMaterial has been created in the project.

Business requirement:

Ability to maintain records in a grid and detail view within the same form.

Development:

1. Click Ctrl+Shift+A to add new item to the project.
2. Navigate to User Interface > Form. Give a suitable name, MAKInventRawMaterial.
Form1
3. Drag and drop MAKInventRawMaterial table from the project to the Data Sources node.
Form2
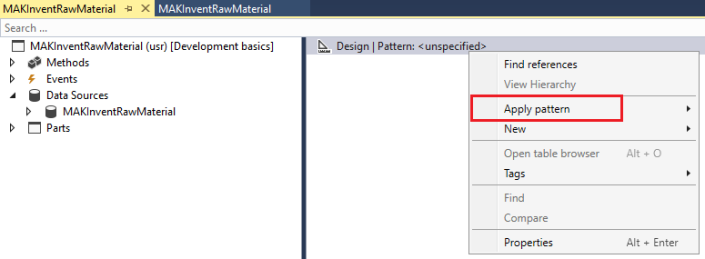
4. Right-click Design node. Click Apply pattern > Details Master.
Form3
5. Once the pattern gets applied, open the Pattern pane to see the missing controls which need to be added to comply with the pattern.
Form4
6. Add the identified missing controls to the Design node in the same order as shown in the pattern tab.
Form5
7. As you can see after adding the required controls the violations have been but still there are some warnings.
8. Navigate to FormGroupControlNavigationList to view its Pattern tab. We still have missing controls for our Navigation List control.
Form6
9. Adding the identified missing controls resolves the pattern issues.
Form7
10. Repeat steps 6 – 9 till all the pattern and subpattern issues have been resolved by adding the missing controls. At the end of the process, you will have a completed form ready to add data source fields to.
11. Add the following field groups to the Details panel from data source table.
Form8DetailsTab
12. Add the AutoReport field group to the Grid control of the Grid panel.
Form9GridTab
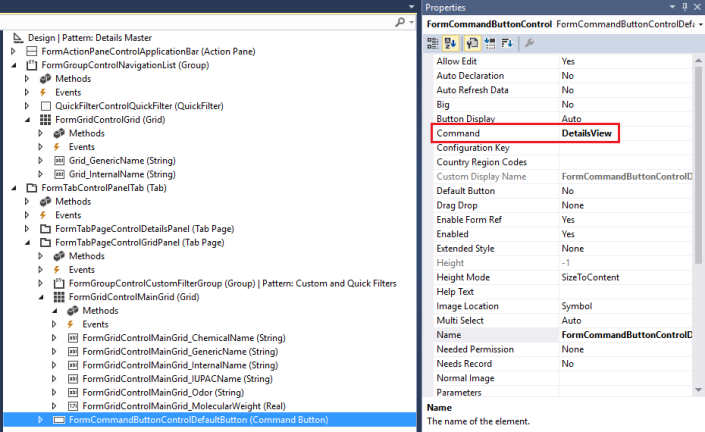
13. Navigate to FormCommandButtonControl and set Command property to DetailsView.
Form10CommandButtonDetailsView
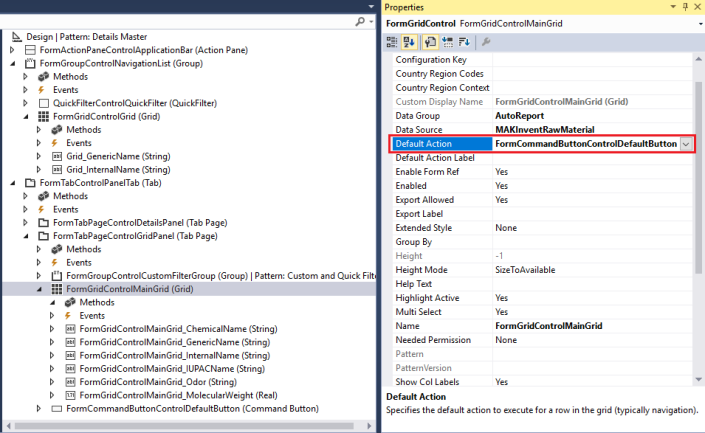
14. Navigate to FormGridControl and set Default Action property to the FormCommandButtonControl.
Form11GridDefaultAction
15. Right-click Project > Forms > MAKInventRawMaterial. Click Set as Startup Object.
StartupObject
16. Select project in your Solution Explorer and click Start in Visual Studio.
17. You should be able to see your form in action in the browser.
18. Grid view.
Form12GridView
19. Details view.
Form13DetailsView

Dynamics 365 AX7 - Create Model and Project - First step to start with development

Dynamics 365 AX7 - Create Model and Project - First step to start with development


This post describes how to create model with correct selection of package which leads to correct development approach either Extension or Overlayering (Customization)

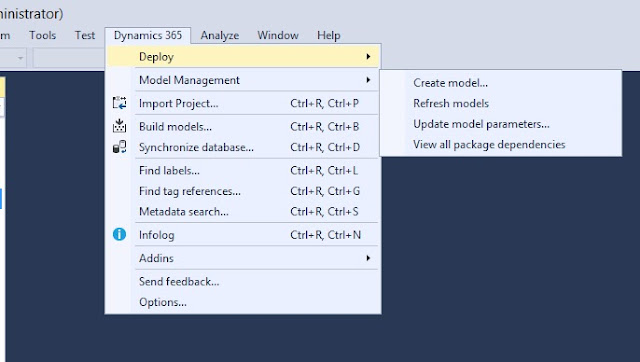
Go to Dynamics 365 or AX7 | Deploy | Create model


Enter required information as shown


Choose correct package


If you decided to go with overlayering, existing package will be selected from dropdown.


Select referenced packages

For this example; I will go with extension development approach, it is easy to upgrade with new versions or updates coming from MS.

Marked all required packages (models) which can be referenced through your new created model. Through these references, you can actually use the element living in those packages (models), without these references you cannot access any element belongs to a different model.

Lets' say you want to access CustTable which belongs to Application Suite package then you have to checked Application Suite package in referenced package list.


Create model Summary

Create new project option will open a new window where you can put the project name linked with this model.

NOTE: A project can only be linked with one model


Project created in Visual Studio


Update model parameters

You may require to update model parameters by adding more reference packages. This can be done as follows;


Select model name to update


Add or remove reference packages 


Click Next will take you model summary screen and will update the project in Visual Studio with updated references. Reference

Labels

#veryusefulcode (1) AIF (8) AOT Maps (1) Args (1) Ax 2009 Reports (2) AX 2012 navigation (1) Ax 2012 Interview Questions (1) AX 7 (2) AX Architecture (1) Ax Backup (1) AX Workflow (2) AX2012 (1) AX2012 R2 (1) Ax2012R3 (1) AX2012R3 Dynamics Connector Step by Step Installation and Configuration (1) AX2012R3 EP Step by Step Installation and Configuration EP R3 (1) AX2012R3 HelpServer Step by Step Installation and Configuration (1) AX2012R3 Rapid Start Connector Step by Step Installation and Configuration (1) AX2012R3 Report Server and Analysis Server Step by Step Installation and Configuration (1) AX7 (1) Best practices (1) Blocking user to enter (1) Collection Classes (1) Container (1) D365FO (3) Data Migration Frame Work ax 2012R3 (1) Deleting duplicate Record from Table – Ax2012 (1) Delivery due date notification workflow in Ax 2012 (1) Development Steps EP (1) Dimensions (1) DIXF (1) DMF in Ax 2012 R3 (1) Dynamics Ax 2012 Interview Questions (1) DYNAMICS AX 2012 INTERVIEW QUESTIONS PART 2 (1) DYNAMICS AX 7 (1) EDT relation Migration Tool (1) EP AX 2012 (1) Ep Lookup (1) Error (1) Event Handler (1) F5 (1) File Handling (4) Filter on AX2012 Listpage (1) filtering (2) financial dimensions in AX 2012 (3) form (1) images (1) Installation and Configration (4) Installation and Configuration (11) Installation of Management Reporter 2012 for AX 2012 (1) Interaction class in ax 2012 (1) Interview Question (1) Interview Questions For Ax 2012 (1) Invent DIm (1) Jobs (2) license (1) List page and form menuitem enable code (1) Methods (1) microsoft Dynamics AX 365FO (1) Number Sequence Generation – AX 2012 (5) Number Sequence2012 (1) OLTP-OLAP (1) Passing Args (1) Passing form caller and menu item caller in ax 2012 (1) Passing Multiple Records Args (1) Posting in Ax 2012 (1) POSTING PURCHASE ORDER (1) Query (1) Query Filter Form (2) Query Ranges in X++ (1) Question and Answer (1) Report (1) Reports Controller class (1) RLS in ax 2009 (1) SALES ORDER IMPORT/EXPORT FRAMEWORK BY DMF (1) Security (1) security roles (1) Security Sysqueryrangeutil (1) Sharepoint 2016 (1) SQL SERVER (1) SSRS (2) SSRS Reports Controller class (2) Table collections & Virtual company (1) Time (1) TIPS AND TRICKS (1) Web service AIF (3) Web Services on IIS (AIF) Step by Step Installation and Configuration (1) workflow ax2012 (1) Workflow installation (1) Workflow Method (3) X++ (1)